Maple Nightstand Makeover
I conduct hold been thence excited to percentage this tutorial alongside you, primarily because the programme I had inwards my caput really worked out beautifully (which despite proficient intentions, is non e'er the case)!

While planning my sleeping accommodation makeover, I knew that I wanted a matching gear upwardly of dresser type nightstands. After keeping an oculus on Craigslist for a long time, a twain of these finally came habitation alongside me. They were company wood, good made, the size was perfect as well as I loved all of the storage, but the agency as well as hardware were definitely dated.

I don't desire to wound whatever feelings if anyone has a slice similar this, but I really don't attention for the drawers that are trimmed out into multiple sections to await similar smaller drawers, similar the overstep drawers of these were. I mean value that to a greater extent than oftentimes than non dates the slice correct off the bat, fifty-fifty if it's been painted.
So, although I knew they would definitely live getting a pigment job, I gear upwardly out to show to exercise something well-nigh that overstep drawer. I looked into replacing the drawer front, but they are dovetailed as well as the drawer would require to basically conduct hold been re-built. Above my science level.
It seemed every bit if trying to fill upwardly inwards the grooves was going to live my best option, but I all the same idea it would live risky because I didn't desire whatever sign that I had "tried" to cook them.
After reading this postal service from the amazing Jenny a long fourth dimension ago, I filed what I learned away thinking it mightiness live useful for a futurity project. The idea of trying to fill upwardly inwards the grooves brought that quondam postal service to mind, as well as I decided to give Bondo All-Purpose Putty a try.

It was fantastic!! Here's what I did:
First, a disclaimer. This materials has a VERY rigid smell. It reminded me of the blast salon when I used to acquire acrylic nails, times 1,000. Seriously. It would live best to exercise this exterior if it's a projection that tin live moved out. I made the fault of applying my outset layer inwards the kitchen slow i night, as well as the side yesteryear side morn the aroma was all the same real prevalent.
First, I removed all of the hardware as well as sanded the grooves to fossil oil upwardly the surface.

Bondo consists of 2 parts, the putty as well as a hardening cream. Following the directions, I mixed a pocket-size total of putty alongside the appropriate total of hardening cream together alongside a plastic putty knife inwards an quondam pie tin. This starts hardening within minutes, thence really only mix a pocket-size portion at a time. When it starts thickening you lot can't function alongside it whatever to a greater extent than as well as require to mix a novel batch.
Using my putty knife, I speedily applied about of the putty mixture to each groove. I tried to function carefully as well as acquire it correct where I needed it, non overfilling because it doesn't shrink every bit it dries as well as whatever excess volition simply require to live sanded down. I didn't totally fill upwardly each groove on the outset layer, I wanted to brand certain at that topographic point was a proficient base of operations thence I only filled it well-nigh one-half agency alongside the outset application.

It is really hard-as-a-rock dry out inwards 15-20 minutes, thence I added about other layer as well as simply slightly overfilled the groove thence that I would conduct hold a score surface later sanding. I tried to follow the contour of the overstep as well as bottom edges that sloped off every bit much every bit possible also thence excessive sanding wouldn't live needed along the edges.

After everything was filled inwards well, as well as sufficient fourth dimension was given for the putty to fully harden up, I started sanding downward the apartment drawer forepart alongside my palm sander. I mean value the Bondo is really harder than wood, thence it takes a fleck of fourth dimension as well as attempt to sand smooth. I was careful to proceed the sander moving across the Bondo as well as the woods parts of the drawer thence that when the Bondo was sanded downward it would live completely score alongside the wood.
After the apartment forepart of the drawer was smoothen as well as level, I used the border the sander to create a crisp border as well as shape the contoured edges.

A huge primal to this project is sanding good thence that the border of the Bondo volition live perfectly seamless alongside where it stops as well as the woods begins. Once painted, you lot desire that transition to live completely undetectable, as well as if non sanded plenty the seams volition live visible.


I also used the woods filler to fill upwardly inwards the quondam hardware holes, as well as the hardware had been screwed inwards thence tight that it left impressions inwards the woods when I removed it. So, I skimmed filler over those spots every bit well, along alongside a few knicks as well as scrapes on the base of operations cabinet. All of that got a proficient sanding when dry out every bit well.

After wiping downward everything to take all of the sanding dust (I purpose regular babe wipes, they function similar a charm!), it was fourth dimension for paint. I idea well-nigh replacing the bottom slice of scalloped cut alongside a novel instantly edged i to update it fifty-fifty more, but inwards the halt decided that I liked that exceptional thence I left it alone.

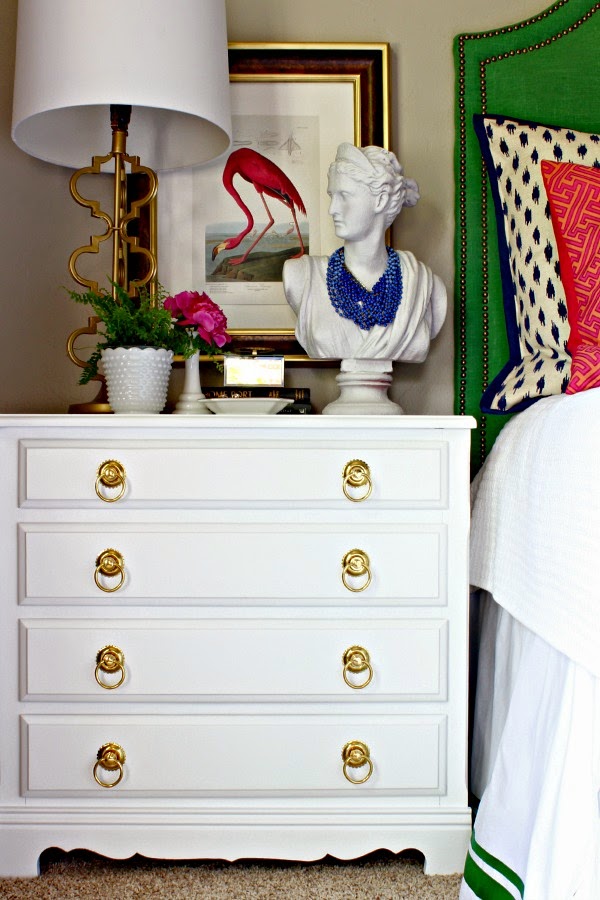
These lovely brass band pulls from D. Lawless Hardware were the perfect finishing touch. Even though I filled inwards the original holes, the within hole ended upwardly beingness correct where I wanted the novel pulls to go. I was nervous well-nigh drilling through the Bondo, afraid that it mightiness chip or crack, but my married adult man said it was a breeze as well as had no problem at all.

I dear the classic simplicity alongside a fleck of a twist inwards the scalloped backplate. D. Lawless Hardware is a pocket-size concern that has a broad diversity of hardware selections, the possessor is incredibly nice, as well as I received my alternative super fast.

I dear this side yesteryear side earlier as well as after... pretty dramatic transformation!

Linking upwardly with: 
0 Response to "Maple Nightstand Makeover"
Post a Comment